Showing posts with label Graphics. Show all posts

Thursday, October 29, 2009

Vector Masking using Adobe Fireworks.

Wow fireworks make's vector masking a child's play, first of all I have to tell you what is vector mask "vector mask is a gradient mask which used to hide a portion of image with some solid color, this solid color have two transparency points in first point the opacity is 100 % and in second point the opacity level is on O% percent, the revealed area of the image is under 0% opacity”. Vector mask are usually used to merge more than two images in a single image.
Now we start this tutorial.

Step 1:

Select an image


Step 2:

Place a rectangle block using Rectangle Tool (or press U) behind the image, which is equal to the desired banner width.

Step 3:

Toggle image and rectangle block position, by using layer palette or Ctrl + keys

Step 4:

  • Use Marquee tool to select area of the image and crop it, we used ruler to make sure that we select required height.
  • Under properties panel we have all properties of a Marquee, which we can adjust as per our requirement.

After Cropping we have this result.

Step 5

Go to command select creative option then select Auto Vector mask.

After selecting Auto vector mask a panel open with following mask options

Select your desired mask option and press Apply button.
OK below image I have done few steps together but below image help you to find out what all I have done.
These two handles visible on image (we also pointed one of them a circle) are used to control mask position and opacity level.
Under the properties panel we have all vector mask options.
Vector mask layer is also highlighted in Layer Palette.


Step 6:

After final adjustment of Vector mask, we put some text on Banner.
Good Luck, I hope that you will learn Vector mask with this simple Tutorial. Please give your feedback to help me to make things better.


At the end of this tutorial i am thank full to Makeup Forever for their image contribution and Dafont.com for their fonts.


Sunday, July 19, 2009

How to Avoid Photo Red Eye

"Red eye" is caused by flash lighting reflecting off the back of the retina.

Red Eye can be avoided in Photos by :

  1. Turn on the lights in the room so that your subjects' pupils will decrease in size.

  2. Ask them to look to the side of your camera rather than straight at the camera when you snap the picture.

  3. Divert babies or pets so that they look away from the camera.

Tuesday, July 14, 2009

How to give Shadow?

Step1 … Open CorelDraw 12
Step 2 … Go to file … and press Import
Step 3 … Select the image …


Step 4 … In the tool box Click on the small black arrow at the bottom right of the 4th last tool named “Interactive Blend Tool” …


Step 5 … More tools will popup … Now Click on the “Interactive Drop Shadow Tool”


Step 6 … Click on the image and drag your mouse to left/right


Step 7 … Shadow will appear on the side you have dragged the mouse


Result:

Thursday, June 25, 2009

How to fill solid color

Step1 … Open CorelDraw 12

Step 2 … Open the Pen Outline/traced image file …

Step 3 … Select the image …


Step 4 … Then select a color from the color pallet at your right side …


Step 5 … Press the Selected Color


Result:

How to use Bezier Tool

Step1 … Open CorelDraw 12

Step 2 … Go to file … and press Import

Step 3 … Select the image you want to trace …

Step 4 … In the tool box Click on the small black arrow at the bottom right of the 4th tool from the top named “Freehand Tool” …


Step 5 … More tools will popup … Now Click on the “Bezier Tool”


Step 6 … Now zoom the part you have to trace first …

Step 7 … Click on the outline of the image which you want to trace … a node will be made …

Step 8 … ... Keeping the left click of the mouse pressed drag your mouse slowly to Left/Right … Two subnodes/control points will come out from the node …


Step 9 … Click on the other point of the outline similarly …


Step 10 … Make the outline of that image similarly … Remember the last node should be placed on the first node … (otherwise your image can’t be filled with color)


Step 11 … Now select the “Shape Tool” from tool box …


Step 12 … When you will click on the nodes … Control points will appear … you can adjust the cu rves of line by moving it left, right, up and down.


Step 13 … Similarly trace the whole image …


Result:

Sunday, June 21, 2009

How to fill color with shades

Step1 … Open Corel Draw 12

Step 2 … Open the Pen Outline/traced image file …

Step 3 … Select the image …


Step 4 … Then select a color from the color pallet at your right side …


Step 5 … Press the Selected Color


Step 7 … In the tool box Click on the small black arrow at the bottom right of the last tool named “Interactive Fill Tool” …


Step 8 … More tools will popup … Now Click on the “Interactive Mesh Fill Tool” …


Step 9 … Adjust the grid size from the “Property Bar”


Step 10 … Now select the grid in which u want to fill the color …


Step 11 … Then select a color from the color pallet at your right side …


Step 12 … Press the Selected Color


Step 13 … By pressing “ctrl” you can control the amount of color … and give shades to your image …


Step 14 … Drag the image behind its outline …


Result:

Remove Red Eye using Adobe PhotoShop

Most of the times, the reflected Flash light from camera creates red-eye in the photos, that spoils very nice photos.
Here's a simple tip to remove this red-eye effect.

Tools required: Adobe PhotoShop [PS] Version 7 or above.
Skill level: Basic.

So let's kick off.

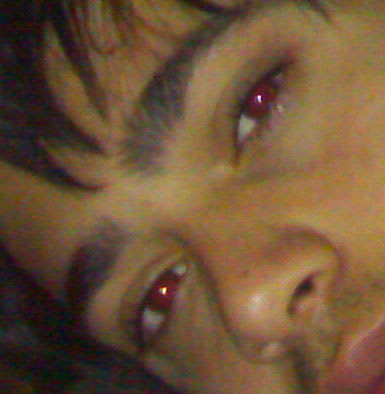
Below is the sample photo, with red-eye.


Open a photo in PS.
To avoid any mishap, Create a copy of that photo first.

Using Zoom tool [Shortcut key: Z, or Ctrl++, Command++], zoom the canvas so that you can see the red eye in quite a larger size. You'll notice that some part of the iris is not red, so we can take the eye color from that part.
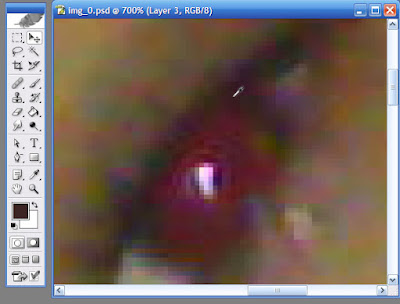
Using eyedropper tool [I], click on the non-red portion of the iris to take eye-color shade, as shown in image below. If you can't find the right color, you can choose the most suitable color yourself.


Create a new layer above the Photo layer.
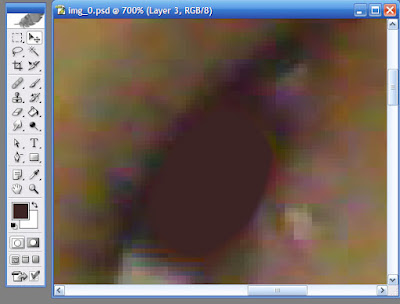
Using Paintbrush tool [B], paint over the red part of the eyes.
For best results, use a brush with some feather-edges around. [Right click the brush tool on the canvas and keep the Hardness value to around 50-70%, or choose a brush with soft edge]. Your Photo will look like, as shown below:
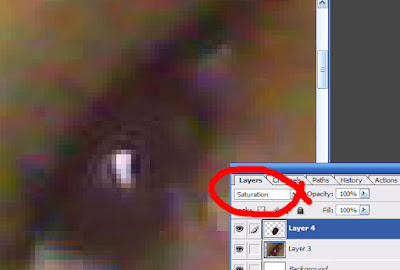
Now, in your Layers panel, [If that is not open, go to Windows > Layers, to open it], change the blending mode of your painted layer to Saturation, as marked in the image below. This will remove the red color, while keeping the shine intact.


In many cases, you are done at this step. But if you still feel that there's some further amendments required, proceed to next step.

Duplicate the layer on which you painted the eyes. [Right click that layer and choose Duplicate, or simply Ctrl+J, Command+J]
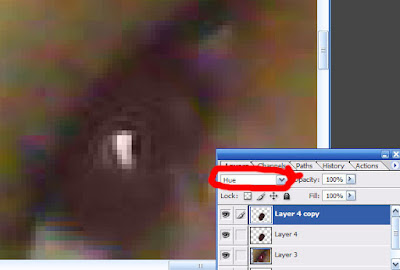
Change the blending mode of that new layer to Hue, as shown in image below:

Zoom out the image to original size.

Congrats!
You're done!


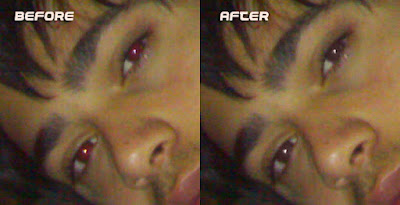
Compare the result with the original one.
No one will guess... :-)

Saturday, June 20, 2009

How to color the Outline?

Step1 … Open Corel Draw 12
Step 2 … Open the traced image file …
Step 3 … Select an outline …
Step 4 … In the bottom right of the window there is an “Outline Color Box” … Double click it …


Step 5 … A window will appear … Click on the pop-up menu of color …


Step 6 … Select the color …


Step 7 … Click Okay …

Step 8 … Now select the same line …


Step 9 … And then select a color from the color pallet at your right side …

Result: